Injection molding is a widely used manufacturing process for producing plastic parts with high precision and repeatability. However, like any manufacturing process, it can encounter defects that affect the quality and functionality of the final products.

Understanding these common defects is essential for manufacturers to improve their processes and produce high-quality components. This article delves into the ten most common injection molding defects, their causes, implications, and potential solutions.
1. Short Shots
Description
Short shots occur when the molten plastic does not fully fill the mold cavity, resulting in incomplete parts. This defect is easily identifiable as there will be visible areas of the part that are not formed correctly.

Causes
- Insufficient injection pressure: The pressure may be too low to fill the mold completely.
- Material viscosity: If the material is too thick, it may not flow properly into all areas of the mold.
- Gating issues: An improperly designed gate can restrict the flow of material into the cavity.
Solutions
- Increase injection pressure: Adjust the machine settings to provide adequate pressure.
- Optimize mold design: Ensure that the gating system is appropriately designed for the part geometry.
- Use materials with better flow characteristics: Selecting a material with lower viscosity may improve fill.
2. Flash (Burrs or Excess Material)
Description
Flash refers to the thin layer of excess material that escapes from between the mold halves during injection. It results in defects along the part's edges that need to be trimmed before further processing.

Causes
- Poor mold clamping: Insufficient locking force during the injection process can allow material to escape.
- Worn or damaged mold: As molds wear, gaps may form that can cause flash.
- Excessive injection pressure: High pressure can lead to unwanted material flow.
Solutions
- Increase clamping force: Ensuring that the mold is securely closed can help reduce the occurrence of flash.
- Inspect and maintain molds: Regularly check mold surfaces for wear and repair as needed.
- Adjust injection speed: Slower injection speeds may help mitigate excessive pressure.
3. Warping and Distortion
Description
Warping and distortion occur when the finished part changes shape after being removed from the mold. This can lead to dimensional inaccuracies and functionality issues.
Causes
- Uneven cooling1: If different parts of the mold cool at different rates, it can cause uneven contraction.
- Improper material selection: Some materials are more prone to warping than others.
- Residual stresses: High internal stresses from rapid cooling can lead to warping.
Solutions
- Optimize cooling channels: Ensure that cooling is uniform throughout the mold.
- Select appropriate materials: Choose materials with lower shrinkage rates.
- Review part design: Redesign parts to minimize stress concentrations.
4. Sink Marks
Description
Sink marks2 are depressions found on the surface of a molded part, usually in areas where thick walls are present. They can be detrimental to the part's aesthetics and structural integrity.

Causes
- Inadequate packing pressure: Insufficient pressure during the cooling phase can lead to sink marks as the material shrinks.
- Material shrinkage: Different materials shrink at different rates, potentially leading to surface imperfections.
- Uneven wall thickness: Variations in wall thickness can exacerbate the risk of sinking.
Solutions
- Increase packing pressure: Ensure adequate pressure is applied during cooling to fill out the part.
- Control cooling rates: Uniform cooling can help minimize shrinkage.
- Redesign part geometry: Aim for uniform wall thickness to reduce the risk of sink marks.
5. Burn Marks
Description
Burn marks appear as dark spots or charred areas on a molded part's surface. These marks can detract from the product's appearance and may indicate deeper issues with the process.
Causes
- Excessive heat3: High temperatures during injection may cause polymer degradation.
- Decomposition of materials: Some materials are more prone to thermal degradation than others.
- Air entrapment: Trapped air in the mold can cause burning by overheating the air pocket.
Solutions
- Adjust injection speed and temperature: Reducing the speed or temperature can help minimize heat-related issues.
- Optimize mold venting: Proper venting can alleviate trapped air problems.
- Use temperature-stable materials: Select materials with better thermal stability to reduce burning.
6. Flow Lines
Description
Flow lines are visible streaks or patterns that appear on the surface of molded parts, often caused by variations in flow characteristics of the molten plastic.
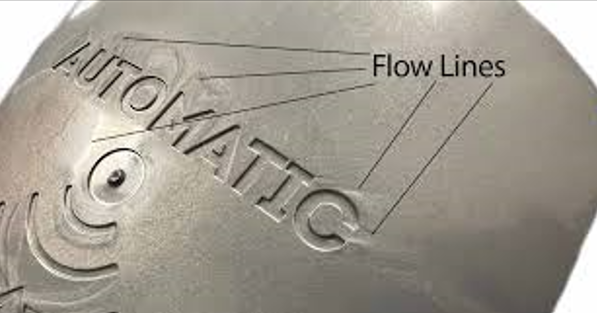
Causes
- Material flow issues4: Variability in temperature or viscosity can cause uneven flow.
- Mold design: Complex geometries can disrupt material flow.
- Gating position: Improperly located gates can lead to non-uniform filling.
Solutions
- Optimize mold design: Ensure smooth paths for material flow and strategic gate placement.
- Adjust material temperature: Higher temperatures can improve flow characteristics.
- Use a consistent material: Variations in material can lead to inconsistent flow.
7. Weld Lines
Description
Weld lines5 are visible lines on molded parts formed when two separate flow fronts meet and do not bond completely. They can result in weakened areas in the final product.

Causes
- Gating issues: Misaligned gates can lead to poor flow and bonding.
- Material viscosity: Materials that are too viscous flow poorly and can fail to bond effectively.
- Rapid cooling: Fast cooling can prevent the two flow fronts from merging properly.
Solutions
- Redesign gating system: Ensure that gates are strategically placed to promote proper flow.
- Modify processing parameters: Adjust temperature and pressure to enhance material flow and bonding.
- Use a bonding agent: Incorporating specific materials can aid in cementing the weld line.
8. Jetting
Description
Jetting occurs when molten plastic flows too rapidly into the mold, resulting in a stringy pattern that can cause surface defects. This defect can impair the surface aesthetics and structural integrity.
Causes
- High injection speed: Excessive speed can lead to turbulent flow.
- Inappropriate gate design: Gate size or shape may create conditions conducive to jetting.
- Low melt temperature: Insufficient material temperature can lead to rapid solidification.
Solutions
- Reduce injection speed: Slower injection speeds can improve control of material flow.
- Optimize gate design: Ensuring gates are appropriately sized can help minimize flow issues.
- Increase material temperature: Higher temperatures can promote smoother flow.
9. Vacuum Voids and Air Traps
Description
Vacuum voids and air traps6 refer to pockets of air that become trapped within a molded part, leading to inconsistencies, reduced strength, and potential failure points.
Causes
- Poor venting: Insufficient venting in the mold can lead to trapped air.
- Material fill rate: Fast fill rates can prevent air from escaping.
- Incorrect part design: Complex geometries may trap air pockets.
Solutions
- Improve mold venting: Ensure there are adequate vents to allow air to escape during filling.
- Optimize fill rates: Adjusting the fill rate can facilitate better air evacuation.
- Simplify part designs: Evaluate geometry for potential areas that may trap air.
10. Discoloration and Material Contamination
Description
Discoloration refers to changes in color that occur in molded parts, often resulting from contamination or improper processing. Contamination can introduce foreign materials, leading to aesthetic and functional defects.

Causes
- Material degradation: Overheating can cause changes in color.
- Contaminated raw materials: Foreign materials mixed with the primary resin can alter color.
- Inadequate cleaning: If the mold is not clean, remnants from previous runs can contaminate new parts.
Solutions
- Monitor processing temperatures: Ensure that materials are kept within specified temperature ranges to avoid degradation.
- Use high-quality materials: Source materials from reputable suppliers to minimize contamination risks.
- Regularly clean molds: Implement routine maintenance to keep molds clean and free of contaminants.
Conclusion
Understanding these ten common injection molding defects is crucial for manufacturers seeking to optimize their processes and reduce waste. By identifying the causes and implementing appropriate solutions, manufacturers can improve the quality of their products and meet market demands more effectively.
-
Understanding uneven cooling can help you prevent warping and improve product quality. ↩
-
Exploring solutions for sink marks can enhance the aesthetics and integrity of your molded products. ↩
-
Learning about excessive heat can help you avoid burn marks and improve the overall quality of your molded parts. ↩
-
Understanding material flow issues can help you optimize your molding process and improve product quality. ↩
-
Exploring the impact of weld lines can enhance your knowledge of product integrity and design improvements. ↩
-
Learning about solutions for vacuum voids can significantly improve the strength and reliability of your molded products. ↩
